2011 Year In Review

When I initially contemplated blogging I wasn't sure if it was going to be something that I enjoyed, but as it turns out I love it. I didn't start blogging until January 31,2011. So it hasn't been quite a full year but it has been a very fulfilling year. To end the year with 112 followers is more than I ever expected back in January. I have to thank you bunches for following along!

This year has gone by in the blink of an eye and like many other bloggers I'd like to end with a small recap of the top 5 favorites.

1. Buffet Update: This was my first time refinishing wood. When I finished it gave me the confidence to tackle #2 on the countdown.

2. Two Toned Roll-Top: I still love this piece. I wish I could have gotten the true color. Its not so cool in color, definitely much more warm.

3. Nail Head Monogram Message Board. I'm still healing from some mishaps with this one! Ouch!

4. Media Cabinet Dresser. Certainly my newest love in the house.

5. Kitchen Command Center: If you do not have a command center in your house, you should think about implementing one. It is our go-to spot now.

Thanks again for being on this journey with me. Looking forward to continuing on in to 2012. Till next time!

Thank You!

Wow is really I can say! I can not believe the response I've received from my Dresser Turned Media Cabinet post.

Janel at Hating Martha awarded me with the Liebster Blog Award. Thanks Janel!


This award is meant to give a big SHOUT OUT to new up & coming blogs...blogs with fewer than 200 followers... (that's me!) This is a pay-it-forward type of award... here's what I'm supposed to do:
  • Choose five up & coming blogs with fewer than 200 followers to award the Liebster to;
  • Show your thanks to the blogger who gave you the award by linking back to them (it might be good to become a follower of theirs too; hint, hint);
  • Post the award on your blog.  Be sure to put a link back to the blogs you have give the Liebster to so everyone else can pay them a visit.
This who I'm passing the torch to:
  1. The Family Room Design Studio: When I first found this blog I knew I was going to love it. You just have to check out her kitchen update. Simply marvelous.
  2. Ties 2 The Past: The painted signs that she makes are amazing. I wish I had half her talent.
  3. Town & Country Living: Jennifer lives in a sweet little farmhouse that is decorated just divinely. Certainly a must see.
  4. The Farmhouse Porch: You have to visit to see her recipe for Antiqued Book Bundles made with new paperbacks. It's the newest thing on my to do list. 
  5. Stonehouse Living: I'm just so smitten with all of her decor. 

As the award were not enough. DaNita at Delightful Order featured my new media cabinet! I was #4 on her most clicked countdown from her linky party. Not too shabby!


If you have never paid a visit to her blog you are certainly missing out! She has a host of wonderful projects for your viewing and inspirational pleasure.

Master Bedroom Updates

Sooooo, not much new on the bedroom front, just a whole lotta painting. I mean a looooooooooot of painting. Not even the type of painting that thrills a person. I've been painting picture rails, baseboards, mouldings, and what not.

It's definitely needed.  In the photo below the door was the color of all the trim. It blended right into the wall color. Don't you think it looks much better now!

I still have the ceiling (which is the same color as the door) and both sides of three doors to do if anyone wants to come lend a hand.

Till next time... happy blogging!

Dresser Turned Media Cabinet

Remember this fabric I ordered for the master bedroom, but when it arrived I said would be perfect in the living room?

Here it is but its taken on a new form as pillows. I am truly smitten with this fabric.

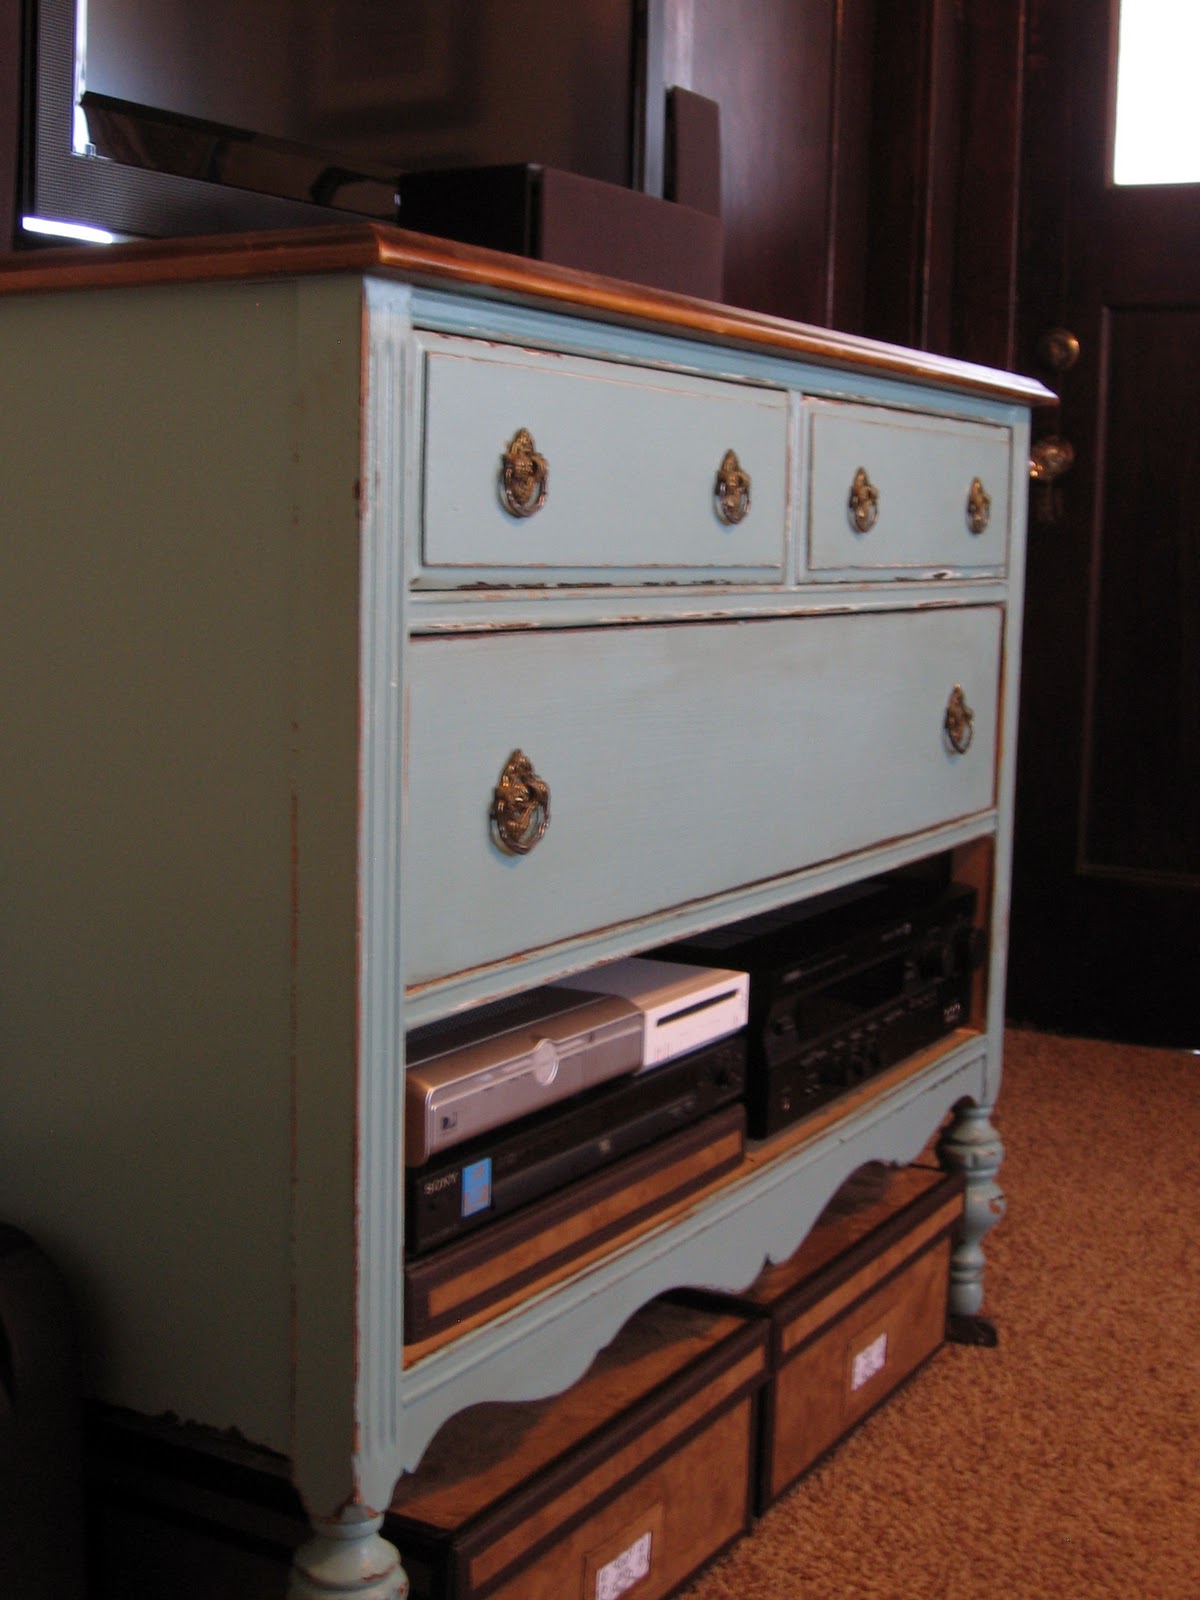
Even though I'm smitten, I didn't realize how much change one yard of fabric would inspire in our living room. But over the weekend I let inspiration reign supreme. After making the new pillow covers, I moved on to our "media cabinet" which was a antique serpentine dresser. Unfortunately, over time the top of the dresser started to warp. Do you see the gap in the front? It may look very minor, but in fact it was driving me crazy. So I changed it!

In walks this tall drink of water... and yes, I almost forgot to take before photos again. She was all battered and bruised from neglect.

Surely, it was nothing a little sanding, patching, more sanding, priming, painting, some more light sanding in between each layer, distressing, and glazing couldn't handle. And handling it was done! Ta-Dah!

Originally, we intended to use the top two drawers for the equipment but the receiver was too tall. No worries, I like them on the bottom just as well. (Yes, ladies I have to endure the speaker system right next to the TV. Can't go putting holes in the plaster walls of our rental. I would love to upgrade to a smaller set.)


This is the view from the couch. See how the fabric pulls in the green ceiling and new turquoise media cabinet. Another recent change is the wall color, they used to be a more golden color. The walls are now Balsam Beige by Sherwin Williams. 

There are more changes on the horizon for the room. I've had these two vases for literally years. I got them  from TJ Maxx in 2004 when bought our second house. Funny thing is, all this time I haven't been sure where to put them. So, I've lugged them to three additional houses since then because I love the colors. I think I've finally figured out what to do with them. But I'll leave that for another post, because I want some input.

I hope you liked my new media cabinet. Till next time... happy blogging!


I'm linking this to:
Creative Kristi Designs <br><br><br><b>Join us every Friday...</b>Furniture Feature Fridays 
The DIY Show Off

Master Bedroom Fabrics... Or Not

I finally received the fabrics that I ordered, for our bedroom, from Amazon. They were.... well, not quite what I expected.

This is the first fabric that I ordered: 54'' Wide Swavelle/Mill Creek Apolima Bayside Teal 

This is what I received: Not at all what I was expecting. I wish that I could say its the photo color that's distorted, but its not. What is described as teal turns out to be a smokey blue. In the picture above there appeared to be more color variation, but in reality, nope not at all.

Something else that I failed to note in the description on the website was the faint line of gold running throughout the fabric. I'm not a fan of it in the least bit.

This is the second fabric that I ordered: 54'' Wide Premier Prints Paisley Chocolate Fabric

This is what I received: Again not quite what I was expecting. The "kiwi" color is actually an olive green and the "turquoise" is more like teal.

This fabric I may use in my living room since my ceiling is painted the exact same shade of green.

So unfortunately, neither of the fabric will spark a jumping off point for out bedroom. What's a girl to do? Go searching through the house for inspiration, of course. 

I was not left disappointed. I found this fabric. Its actually a table runner from our dining room. I love it and it has all the colors that I want to incorporate in our bedroom.

I adore the hint of yellow.

So the search continues. But what I can tell you is that I will no longer be ordering fabrics off the web.Guess I'll be taking a drive to the fabric store (with table runner in tow)... the closest one is about 30 miles away.

Till next time.

1980s Planter Bookcase Update

Last week, I informed you I would be working on a bookcase over the weekend. Originally I was hoping to have it done by Sunday afternoon. Well, two days late and two dollars short. However, its done! Yippee!

What took so long? The dry time was extended because it decided to get a little chilly in these neck of the woods. And since I'm working mainly in the unheated garage I have to wait for it to warm up on most days, which is normally around noon. I'm sure my client was wondering what in the world was going on with her bookcase.

Now, let's go back to the beginning. The only before shot I took was of Mr. Uncluttered sanding her.
She was scratched up pretty bad and there was some water damage on the front.

This is mid-way during the makeover. She's all cleaned up with darker stain, but there were still a few problems.

Remember she was once a planter and was butted up to a wall so her top and side were open. We certainly had to do something to rectify that.


Here, she is in all her glory, even though that glory is still in my unglorified garage. :(


This is now the once open side.

Take a look at the top now. Oh baby! Can you see where we repaired it??? Look closely. Yup, we're that good. Ok, ok... we're good, but not that good. This is what we did. (Don't pay attention to the mess in the background.)

Ta-Dah! We added a false top. My client requested a way for her to conceal her new hiding spot. Pretty genius, right. The moulding on the edge just hides the fact there are two pieces.

The top is attached with two heavy duty hinges because that sucker is heavy! Its 66 inches end to end. Imagine all the secrets that could get lost in there. I wish I could take credit for the idea.

Here Mr. Uncluttered is pointing out his handy work. To tell the truth I could not have finished this without him. Thanks honey!!!

There it is folks from this:

To this:

I think I'll be on the lookout for my own former planter built-in bookcase.

Till next time.

You can find me partying here -
WUW - Savvy Southern Style
Fall into Fall - DIY By Design
Piece of Work Wednesday - Primitive & Proper 
Saturday Splendour - Meg & Mum's
Amaze Me Monday - Dittle Dattle
Meta Monday - BNOTP


Happy Friday and A Project

TGIF!!!! I'm so glad it's the weekend, but there's relaxing ahead for this lady. This weekend I'll be finishing up a project.

Do you remember when built-in bookcases with planters were all the rage. Like this one, not the same one, but looks identical to what I have in my garage right now.
Google

My client ripped one out when they had a house fire and the plan is to fix it up!

Here's the Mister doing a fine sanding job. From the picture you can kinda tell that she (the bookcase) is no petite thing, my hubby is 6' 4" and the bench he is on is at least 16" tall. (Note the RayBan "safety goggles." Certainly part of his geek chic attire.)

And here is the former planter box. What was the design industry thinking? Water... wood... in the house... go figure. But anywho, let's have a sneak peek shall we.

Looking good right! No more water stains, but what's next? Well, let me tell you. First, put a panel on the left side and stain. That's where the bookcase met the wall. Second, fix the top planter bed so its usable. I can't wait to share what's happening with the top, genius I tell you, pure genius.


Till next time (hopefully Monday)... happy blogging, antiquing and of course weekend!


Show You What I'm Working With

Today I thought I would show you what I'm working with in the  "master" bedroom. This is the current state of the bedroom. Get ready, its not a looker for sure.

This is looking in from the main door. I definitely am working with a blank slate. And Mya had to take advantage of the photo op! Oh and please note the lovely window AC, just darling isn't it?! And as you can see the bed takes up the whole room.

This still looking in from the main door at the end of the bed. The farthest door is to the bathroom and the one closer is the tiny closet.

Mr. Uncluttered loves this headboard so she's a keeper. If I even suggest replacing it there will be problems.

This is a close-up of the bed. I may decided to use Rub N Buff in Ebony to cover up the gold. What do you think?

There you have it, folks. My currently boring and small "master" bedroom. For the record, I don't the mind size too much, but if the bed is going to take up most of the room I want it to be luxurious. So, my end goal is a glamorous and sexy retreat for me and the hubster.

I don't have a jumping off point, but I have ordered a few samples of fabric. 


We'll see which one, if any, makes the cut. I'll keep you posted.

Till next time... happy blogging!