Antique Mall and Inspiration

After running a few errands today I took a little gaunt to the local antique mall. (Sorry for the low quality photos. They were taken with my Droid.)
I have no idea why I've never visited this one but I haven't. However, I'm glad that has all changed. This place is amazing. I was truly surprised when I walked in. The lady behind the counter just chuckled while I stood paralyzed by utter shock. I was expecting something a lot smaller. Boy, was I wrong!
For all the Shabby Chic lovers.
There were quite a few deals to be had, like these Bakelite utensils for $1.00 each.
Isn't this pitcher and glass set sweet?  
On to the inspiration... vintage glass lamps. They were selling for $95.00 for the set.
These are a set of lamps that I have sitting at home. They're just sitting in my project room collecting dust. The $95.00 price tag certainly inspired me to get them finished, especially since they were given to me for free!
They are just darling. I guess I better get to work repairing and finding some lampshades.

Till next time.

What Happened To The Microwave?

I'm sitting here trying to come up with a snazzy post for a simple plate redo and I am drawing a complete blank. (Maybe I should turn off the Laker game.) What to type... what to type? Well I guess I should just start at the beginning... (sounding all dramatic.)

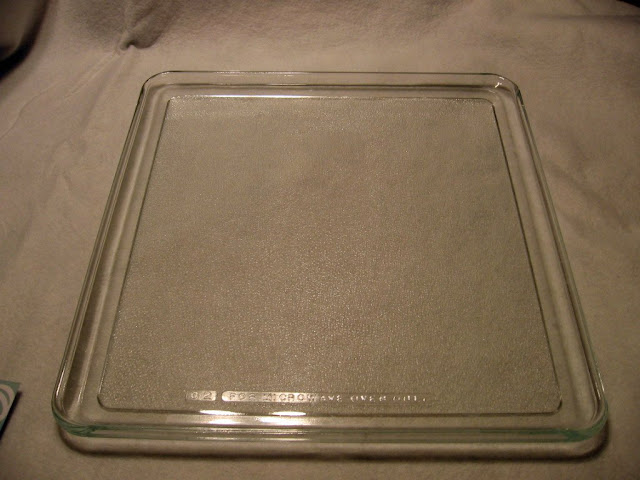
Trust me there is no drama here. It was simply a plate that I had sitting around. No, not a dinner plate. It was a microwave plate... is that what they're called? You know, the plate that comes in the microwave and turns. Somehow I pickup an extra plate but I'm missing the microwave. I couldn't see throwing it away so I repurposed it with a little redesign. Besides its not the standard round plate its square.


Initially I thought I was going to decoupage this cute paper to the bottom of the tray and utilize the glass top.

However, there was one minor problem. The writing underneath would show through, but beyond that I wanted to cover up the pebbly finish.

To get a perfect fit, I flipped the plate over and used the raised edge to measure.

Then I used a straight razor to get a perfect cut.

And here it is all decoupaged and done. Kinda cute, right.

I haven't decided exactly where to put it but it may go on the buffet in the background. Or it could go on ut the wall, or it go on a table to hold candles or... the possibilities are endless.

Oh and even if you're looking at the back, its still a pleasing sight thanks to double sided scrapbook paper. :)

Till next time.

I'm linking this to:
Delightfully Inspiring Thursday - Delightful Order
Hooking Up with HOH - House of Hepworth
\

Faux what?

I have been away for what seems like an eternity. First, there was the whole leaving my camera in another city. Then last week we were on vacation in Las Vegas, NV. Good times!

We stayed at a beautiful resort for a few days, The M Resort. The hotel was gorgeous. The weather was perfect, about 81 degrees everyday. And of course the view was to die for. This is from our hotel room, looking at the strip. As you can tell this resort is off the strip. Its a different world away from the strip, more relaxed.

Doesn't this look like a picture taken in the Bahamas?

But I was most fascinated with something I failed to take a picture of... the faux duvet cover. This picture is a result of my Google search. I didn't find a picture of the faux duvet exactly, but of the bed. (It was quite comfy, I might add.)

I'm sure your looking at the bed like what's the big deal. Looks like just a regular duvet, right?! Oh yes, they had me fooled until it was bedtime. What is this? Hmm, its not a duvet at all. The comforter is simply between to flat sheets, that's interesting. 

Then I'm sitting back at home and it hits me like a ton of bricks. OH NO THEY DIDN'T! Two sheets!!!! The down comforter is sandwiched between two flat sheets... and they are not even sewn together!!!  GENIUS! Why didn't I think of that. 

How often you could change the look of your room? Just change the top sheet and you have a new look. Pets get on the bed... no problem, throw the top sheet in the wash when you change your linens. I'm telling you people, they are on to something BIG! I am sooooo doing that in my bedroom.

You may not be as excited as I am, but I have a Cal-King and duvet covers are not cheap people! This is going to save me ton of moolah. Mr. Uncluttered should be happy as happy as I am. ;)

Till next time.

Mirror, Mirror On The... Dresser

The bathroom in our rental is small... I'm talking tiny. There's room for one person and one person only in front of the mirror and/or sink at a time. I mean I can't even think about brushing my teeth at the same time as Mr. Uncluttered, because its going to be baaaaad situation! With that said, I'm often left waiting to "put my face on", which in turn makes us late for almost everything... you can't rush perfection (HA, yeah right).

Anywho, in comes this so sad mirror.
 

This what happens when I remove the binder clip... oops!

Told you it was sad, but the ugly duckling got a makeover starting with these:

I thought that I would be finished once I coated it in Oil Rubbed Bronze so I added a coat of sealant... or so I thought... what's wrong with this picture????

Remember when the crackled finish was all the rage... well I grabbed the wrong can and this is what I get for not paying attention. What to do... what to do???

Paint over it! Can you see the crackle coming through? I can. (BTW, the paint is not yellow, its a creamy white.)

So I made lemonade out of lemons. I distressed it. It really helped the details stand out. Not so one dimensional anymore.

After a few passes of some steel wool the crackle looks intentional.

Here it sits on my dresser.


Thanks for visiting. Till next time.

I'm linking to these parties:
Meta Monday - BNOTP 
Amaze Me Monday - Dittle Dattle 
DIY Project Parade - The DIY Showoff
Motivate Me Monday - Keeping It Simple
White Wednesday - Faded Charm
Wow Us Wednesday - Savvy Southern Style
Power of Paint - Domestically Speaking
Delightfully Inspiring - Delightful Order

Inspiration Friday - At the Picket Fence

I Can't Believe I Forgot It!

I hope everyone had a wonderful weekend. Mr. Uncluttered and I had a grand weekend with my family. Every three months all of my immediate family (Mom, 4 sisters, mates and children) get together for family dinner and have a blast, all 14 of us. This particular time it was at the eldest sibling's house, who lives two hours north of me. 

First thing Saturday morning the hubs and I loaded up the car with golf clubs, Mac N' Cheese, Apple Cobbler, camera and plenty other paraphernalia to keep the drive interesting and then set out on the road. Now skipping all the details, we had a wonderful time and I took a ton of photos.

Then Sunday morning we hit the road again for the drive home. Just as I was putting away all the paraphernalia back at home I received a phone called... its my eldest sister. Here's how the conversation went:

Me: Hello.
Her: Hey. Is your camera bag gray?
Me: Yes. Why?
Her: It's sitting here on my coffee table.
Me: NOOOOOO!!! 

Those were the highlights because the rest  of the conversation is just a blur.

I can not believe I forgot it! I can not believe I forgot my camera two hours away. I considered driving right back to her house but gas is over $4.00 in this wonderful state of California. Sooooo I'm camera-less (unless you count my cell phone) until at least Tuesday when she is dropping it off at the halfway point, Mom's house. Ugh!

I've Been Benched

A couple of weeks ago I showed this very sad bench in one of my bunkhouse posts. She is a recovery from the plethora of stuff in the bunkhouse.

Well, when I brought her into the house for a redressing I discovered that she had... Oh I don't know... ONE MILLION upholstery nails in her, very similar to these.
9/16" Blued Upholstery Tacks - Click Image to Close


And of course there was an second layer of fabric with its own set of ONE MILLION nails. So that means, I painstaking removed TWO MILLION individual nails. Well, to be honest it probably just felt like two million, however it was a lot. Good times people, good times! 

After that smooth sailing, right? WRONG! What I thought was a great sanding, turned out to be a fallacy. Why do I say that? Take a look below. Notice anything horribly wrong after the first coat of primer?

Let's try this again. Coat number two. 

We went on like that for another few coats of primer. Finally I decided to just put the paint on and pray there would be no bleed through. HALLELUJAH! It worked. And here she is with her new drop cloth top on and deciding what type of skirt to wear.

She decided on a pleated skirt instead of ruffled and a two tailored bows to spice it up a little. (The color is Meadow by Valspar in Eggshell.)

 The bow is totally no sew. My good friend was a great helper with them:


Mr. Uncluttered has taken her over already for the mudroom. The previous bench we had in there was too big. Oh well, I guess that means he likes her too.


Till next time. 

I'm linking this to:
Inspiration Friday - At the Picket Fence

Let's Do Some Work

I'm in the process of reworking my home office and no surface is being left untouched, including my roll-top desk. A dear friend had her sitting in storage and when my friend offered her of course I said, "Yes!" Well, she then sat in my office for over a year and last Saturday I decided it was time to stop the procrastination. I think mentally I was psyching myself out because of the roll-top, thinking it would be harder to refinish than it actually was.

If you follow my blog than you know it did take longer than anticipated, not due to the difficulty, but because life got in the way. Between dealing with clients, a splitting headache and a delayed knob retrieval I didn't officially finish until Friday evening. But let me tell you she was well worth the wait.

Here she is before. (Forgive the mess, I was moving everything around.) Not an antique by any means, just a desk with cheesy gold-plated handles.

Here she is with her top down.


Before we get to the after... Let me apologize for not taking photos of each step. I'm bad at that, besides my hands/gloves were covered in either paint, stain or poly during the entire process. But I can tell you what I used.

And now on to the after... oh she's a beauty!!! (If I do say so myself.)

The majority of her got a light sanding, two coats of primer and two coats of Dover White by Do It Best. Of course I couldn't stop there. Then came the distressing and antiquing with Dark Walnut wood stain by Minwax. (Oh yeah, I used a flat paint because I wanted the stain to stick.) I covered all the painted surfaces with the stain, waited a minute or two, then wiped it off with an old towel and followed by a damp old t-shirt. And finally two coats of Wipe-On Poly in Clear Gloss by Minwax.

I added new knobs and handles in Aged Bronze. I debated between these and Brushed Silver, but I definitely think I made the right choice.


Here she is with top up. I decided to re-stain the two work surfaces along with interior. Nice surprise when you open her up... oh la la. 

Can you see what has changed in this photo?

I drank my Chai Tea... while taking photos and writing this post. Yummy. :)

Oh and by the way this only cost about $20 total for the delayed knobs! Oh yeah! 
Thanks for visiting... Till next time.

I'm linking this to:
Meta Monday - BNOTP
Amaze Me Monday - Dittle Dattle
DIY Project Parade - The DIY Showoff
Motivate Me Monday - Keeping It Simple
Nifty Thrifty Tuesday - Coastal Charm
Twice Owned Tuesday - House of Grace
One Project At A Time - A Bowl Full of Lemons
White Wednesday - Faded Charm
Wow Us Wednesday - Savvy Southern Style
Power of Paint - Domestically Speaking
Transformation Thursday - The Shabby Chic Cottage 
Inspiration Friday - At the Picket Fence
Frugal Friday - Shabby Nest
Furniture Feature Friday - Miss Mustard Seed
Best DIY Projects of April - Beneath My Heart