Showing posts with label Our Home. Show all posts

Cleaning Out My Closet For Spring

A few weeks ago I shared a couple of photos, on Instagram, hinting that I was in the middle of spring cleaning my main closet and switching out fall/winter clothes for spring/summer clothes. I figured I'd share the end result with you today.

The first thing I did was empty out the closet and clean it, making sure to get all the dust bunnies to vacate the premises. Then I went through and separated out the cold weather clothes. Lets be honest. I live in the Central Valley California, other than a few thick sweaters, scarves, and a few pairs of boots, there's not much to my cold weather clothing. But I did remove the darker colored clothes from the closet and added in my brighter clothes. 

While I was at it I went through everything and made piles for donation and trash. The trash pile is on the left and the donations are on the right.

Then it was time to store away my winter clothes.

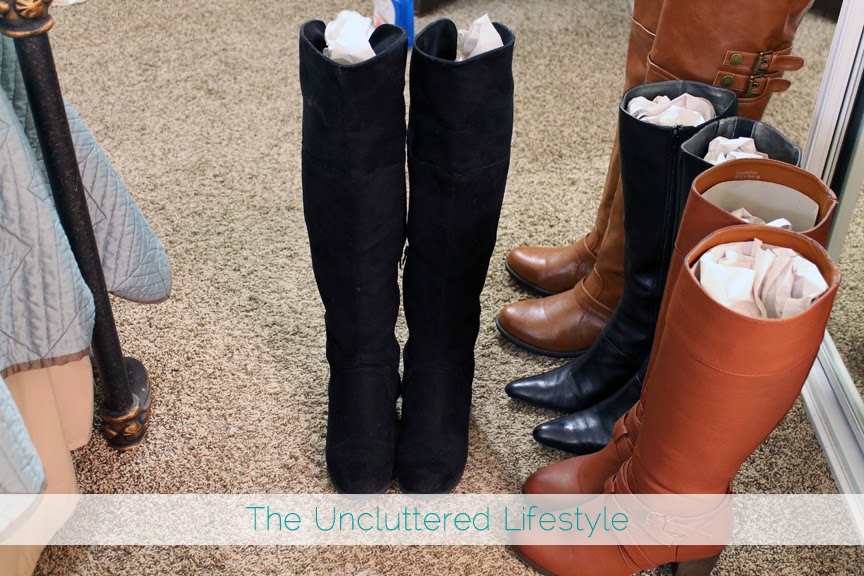
 I use two canvas bags that slide under the bed to store everything and the packing paper is to stuff my boots.

This is why I had packing paper for my boots. If I were to store my boots like this until next winter they would be disfigured when I pull them out.


So after they are cleaned I stuff to maintain their original shape. Now they are ready for the summertime slumber.

Here they are all packed and ready for storage under the bed.

Now lets look at the cleaned out closet.


The top box contains a few hats and the bottom box has my bikinis and beach coverups.


I need to replenish my supply, I got rid of 6 pairs of shoes

The left side is so hard to photograph.


Flip flops are just waiting to make a reappearance for 2015.

While I was at I decided to tidy up my dresser drawers too. Top drawer has my undergarments and sleepwear.

Middle drawer has t-shirts, tank tops and lightweight sweaters.

Bottom drawer has all my workout gear.

Side note: Did anyone else notice the abnormal amount of black or black and white I have in my wardrobe? Seriously people it's an obsession, I need therapy. I think it comes from my modeling days when the mentality was, "black makes you look thin." But I have friend that's a personal shopper and she's been working with me on adding splashes of color through my shirts and scarves.

Anyway I digress... have you done any spring cleaning yet?


A Quick Revisit To The Master Bedroom

Good day all!

It seems that as of late I have been all consumed with everything related to planners (hopefully you don't mind too much) but I thought it was time to get back our regularly scheduled program. What better way to do that than by revisiting one of my previous post. I thought I would share the place where I lay my head at night, the master bedroom, with you since I have a few new followers that may not have seen the space.

There are so many elements in this room that I love, I would be hard pressed to narrow it down to one thing. The room is filled with little moments that make me smile before turning off the lights and closing my eyes at night. All the personal touches that represent everything that's important to us.


Because we all lead very busy lives, I've tried to keep the feel of the room very tranquil, using shades of white, cream, brown, and accents of turquoise. On the bed, I only use white or ivory sheets to keep with the spa-like feeling. I love pulling back the comforter and crawling between the sheets and feeling the cold crisp sheets against my skin. There's nothing I look forward to more than getting into my bed, made with a set freshly laundered sheets, and falling asleep. 

Since, spring is now here and it's time to switch out our winter bedding for the summer bedding, I'm thinking of getting a new set of sheets for the warmer weather. Honestly, I'm always on the hunt for quality bedding because this Cal-King of ours is not cheap to outfit. Lately, I've been perusing Parachute bedding looking for our next set. I have spied a few on there that I can't wait to take for a test drive. I'll let you know how it goes. May the odds be ever in my favor! 


Till next time...


DIY Kitchen Drawer Divider Project

I have a secret the share will everyone today... you ready? When we moved into our condo a few years ago, I instantly set about organizing all kitchen. Oh yes, the cabinets looked good and the "majority" of the drawers looked good. Wait, did  I just say the majority? Yes, I did. You see there there were two drawers in particular that proved to be my nemeses. 

My first nemesis came in the form of my silverware drawer. I have searched high and low for a drawer organizer that is narrow enough to fit the 17 3/4" x 9 5/8" x 4" drawer. However, I never found one narrow enough with a configuration that I liked. So this what we've been living with... and when the Mister constantly complains about it being too messy for him, you know it's time to address the situation.

So I decided to DIY an organizer and defeat my nemeses. But I had two criteria, they were must be removable because this is a rental and must be cute to look at. Then I remembered I had some cute Contact paper stashed away in my hoarder closet and my idea was born. I was going to use foam core board covered in the contact paper to build it. 

Supplies:
- Form Core Board
- Contact Paper
- Measure Tape
- X-Acto Knife
- Ruler (for straight edge)
- Hot Glue Gun (not picture) 

First, I emptied and cleaned out the drawer.

Next I measured and lined the bottom of the drawer and laid out the silverware for placement. Can you see how narrow it is... so frustrating.

Before I cut the foam core I had to measure the depth of the drawer to make sure I didn't cut the sides to high. 

I didn't take any pictures of the cutting part or covering the foam core with the paper, but that's pretty simple and self explanatory, I think.

Here my gorgeous drawer now... looooooove it!


I did run a bead of hot glue down the seams of the dividers for sturdiness.

Now it was time to take out my other nemesis... the utensil drawer.

 Following the same order as the first drawer, I emptied and cleaned it out. This time, I needed to go through all my utensils and even discard a few. Who really needs 4 sets of measuring cups and 4 sets of measuring spoons? Next I played with the configuration before I cut my pieces. (Side point: I hate those knobs, I should think about changing them.)

And here is the final outcome... as you can see I played around with the configuration a few times before I was satisfied. But alas the final nemesis has been defeated!


I was already happy with this project but as I sit here and type this post my smile is getting bigger. It just occured to me how inexpensive this DIY project really was. The form core was $2.50 for the sheet and I still have half of it left. The roll of 18"x 24' (yes, 24 feet) Contact paper was $6.00 and I barely put a dent in it. Hmmm... let's do the math on this one. It would be $1.25 for the foam core. The Contact paper equates to .25/foot, I used about 3.5 feet. So that's .88 cents plus 1.25 for a grand total of $2.13 for two organized drawers?!?!

Makes me wonder what else can I organize with this method?


Surviving This Cold Season... And A Natural Disaster

I don't know about where you live, but here in California the cold and flu season has been a nightmare. It seems most people I know have been dealing with a fever and a nasty cough for several days. I thought I was going to make it through the season without catching anything. Buuuuuut.... Mr. UC brought the bug home and refusing to quarantine himself, spread his germs all around the house. And low and behold, it was then my turn, but I think I'm finally on the uptick.

But while I was trying to survive this little nasty bug, the mister brought home, I was also preparing for our family to survive a potential natural disaster. Living in California, there is one natural disaster that is constantly in the back of my mind... earthquakes. In the last year, California has had 6,930 earthquakes and add to it, the fact that we live in a flood zone, you can see our need to be prepared. 


 Let me introduce to you a little nine page handbook I created to use as a quick reference guide.

I scoured various websites to gather tidbits I thought would be helpful, because lets be honest, I'm no survival expert. Other than watching a lot of survival shows and commenting, "I would never eat that" or "Nope I'll never visit there," that's as far as my survival expertise goes. I mean seriously, there's no way I'll be in the Costa Rican jungle having to eat half of the creatures they put in their mouths. I am way to scary and way to picky for that. But alas, I do live in earthquake country and in a flood zone.

Sigh, I digress... the bottomline is, I am no expert.  I needed some help preparing this guide now so I don't have to hunt rodents in the future to survive on. Ok ok, now back to the guide.

In this handy little guide; it addresses water storage.
  

It addresses food storage. 
It tells you how to build your own first aid kit.
 

 It also gives suggestions on what to include in your family's survival kit.

And finally it has a checklist of everything I will include in our kit.


A few of the websites suggested creating a survival kit for your car and workplace. The truth of the matter is, you never know where you will be when disaster strikes. You could be in your car and if you live in an area where it snows there's a greater need for you to have a kit in your car.

Also, if you or a family member leaves the home for work, you should have kit at the workplace. The workplace kit should have enough in it to get you home, if you have to walk.

Lastly because many of us have furry four-legged family members, there is a survival kit list for them as well.


As soon as our kits are fully assembled I will share pics with you.

If you are interested in our little guidebook, please click {here} to download.


Till next time...