Showing posts with label Crafts. Show all posts

DIY || Spray Painted Wicker Basket


Aloha Sprinklerinos,

It's no secret at all that I like things in muted tones and pretty looking. I know shabby chic is just sooooo 2010 but frankly, I don't care. Throw me a bit of distressed wood and lace and I'm yours. 

How To Spray Paint Wicker

How To Spray Paint Wicker

How To Spray Paint Wicker

How To Spray Paint Wicker

How To Spray Paint Wicker

How To Spray Paint Wicker

We'd had this wicker basket floating round for a few years and I liked the shape too much to throw it out during my current 'get rid of crap' phase. I decided that the only way it was staying was if it were usable and so project make-the-wicker-white-and-think-of-a-better-project-name-next-time came about. 

This was probably the easiest craft project I have ever done in my life. 

How To Spray Paint Wicker

Using a damp cloth, clean the basket.
Allow to dry.
In a well ventilated and protected (you don't want spray paint everywhere!) area, hold the can 30-50cm away from the object and spray evenly.
Leave to dry (I left the basket outside for a good few hours).
Embellish.

My spray paint was bought from hobbycraft. Just read the label to see what kind of materials it is suitable. This said yes to wood so I went for it. 

Easy peasy! My basket still has that 'new paint' smell but I think in time it will fade. Overall, I'm really happy and think I've caught the spray painting bug! Watch this space!!


Toodlepip!

xx

This month my Ultimate Advertiser is Barbie and Pie. If you would like to find out more about advertising on this blog, click HERE.


How To :: Colour Glass Jars


Aloha Sprinklerinos,

Remember back in the olden days when I was Mrs Loved To Craft? Well, the other day she was back! back with a painty-inspired-by-pinterest venom!

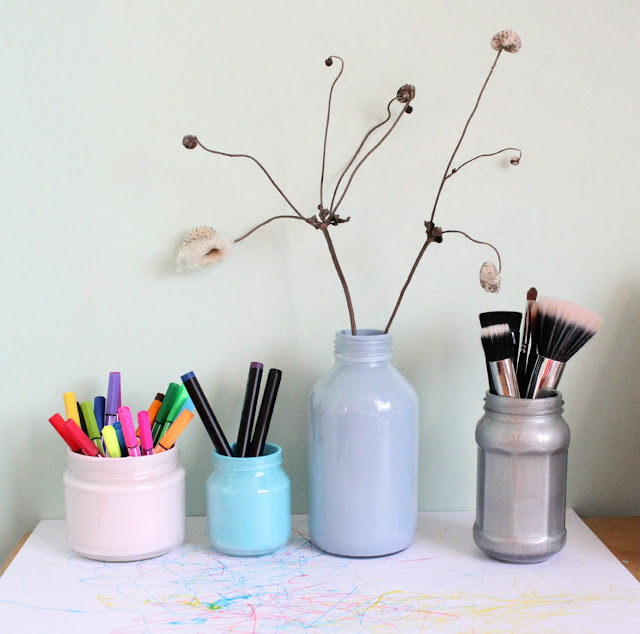
How To Colour Glass Jars


Now, before all you DIY goddesses throw down your PVA in anger, yes, I know there is more than one way to colour glass jars and I think all of them are lovely. This way however, is with acrylic paint and is beyond simple. I like simple.

How to colour glass jars


Gather your clean, dry glass jars.

Generously pour acrylic paint (I bought mine from Hobbycraft) into the bottom and if you can, round the edges INSIDE.

Roll/twist the jar about to encourage paint to coat the inside completely. 

How to colour glass jars

On newspaper or a surface you're happy to ruin, leave the jars upside down to finish the inner coating and let the excess paint drain out. 

How to colour glass jars

Leave to dry and add contents.

Voila!

Do you think this is something you'll try? Think of the possibilities!!

Toodlepip!
xx
This month my Ultimate Advertiser is Ji Ji Kiki . If you would like to find out more about advertising on this blog, click HERE.


Darcy Date Day


Aloha Sprinklerinos,

A couple of days ago I made a decision. I wanted to have a Mummy-Daughter Date Day where we did nothing but fun things and no work, errands or chores. And so we did.

I didn't take too many pictures because we were too busy being in the doings AND photographing an excited toddler is like catching clouds- impossible!


 Excuse the messy background, this was a little snap I took pre paints but post toddler joy at finding a roll of parcel paper. The fun she had with that! I had the paint out and her in a vest ready to get messy, but a roll of brown paper and a my little pony hair comb was far more exciting than the carefully planned activities I'd laid out. 

It only took about 3 seconds for me to realise I was going to have to go with the flow and if that meant finding 600 games with tubes of paper, then so be it.


It turns out that paint hand prints are not our skill. Pinterest makes these things look so easy but alas, they are not. These were the sort of standard we got but I'm happy. Baby Glitter got quite the kick out of squelching paint in her chubby little fists, so all was not lost at sea. 


Footprints on the other hand (oh, hand, see what I did there?) were quite the breeze and I now have about 30 mint copies of Darcy's right foot. I also have art from this time last year too so I look forward to seeing how much she's grown.


Thank goodness for wet wipes!

It was a brilliant day. We did SO much! I'm sat here at this computer, typing and deleting sentences because I want to put into words the love and bond I feel for this little creature that came into my life under two years ago but it's so difficult. To put it simply, I feel like she is a part of me. I sense all the things she feels without her saying and I never go a minute without having her on my mind. I feel like my mind is richer for having her in it. When she plays with me and puts her little warm hands on me I feel honoured that I was given such a blessing. *Grits teeth* I want to squish her little head! (NB :: This is a figure of speech, obviously would NEVER squish her head!! Cripes!).

I can't believe I went so many years without her in my life because now I can't imagine a life without her.

Taking a day out has made me cherish those 100% moments and I am all the more than happy to ignore the dishes and the emails and the rest of the world to spend that time with the little love bug.

I'm quite sure that if you are not one for children that this post might have made you a little queasy at the smooshiness, but if you are a 'baby/child person' or a Mama yourself, I know you'll get it.

From the photos above, can you guess what we made?


Toodlepip!
xx


This month my Ultimate Advertiser is Ji Ji Kiki . If you would like to find out more about advertising on this blog, click HERE

The $25 Organizing Challenge


How far in the world of organizing can $25 get you??? Well I guess that depends on the amount of time you are willing to invest. If you just want to pop into your local Container Store, than probably not very far. That’s not to say I don’t love Container Store because believe me I do, its just that if you want your dollar to stretch, sometimes you have to do a little bit of the work.

I received a challenge to come up with a crazy-cool organizing idea/project that could be completed for less than $25. I instantly thought of a pair of shutters that I’ve had collecting dust in the garage since last summer, I knew one day I would use them on a cabinet. Well , the day had come and my plan was to build a craft/painting tool cabinet.

The first part of my mission was to locate some pegboard… check. The Home Depot cut a 8’x4’ sheet in half for me, since I only needed a sheet that was 37”x29”.  Cost for half a sheet $8.50.

Then I went to my local lumbar shop and asked for some scrap plywood for the cabinet box, which they cut to size for me for $5.

And finally at the hardware store I bought 3 packs of pegboard hooks for $6. Leaving me with a total of $19.50 spent! Now all I had to do was assembly everything.  Super easy!

1. Assemble the cabinet box using wood screws. (Tip: Make sure that each of the corners are square or else the doors will not be flush. And use screws, instead of nails, they can take more weight when the cabinet is loaded.)

2. Lay the pegboard on top of the cabinet box and mark with a pencil where to cut.

3. Cut the pegboard just outside the line you marked, since it will shred as you cut.


4. Attach pegboard to cabinet box.

5. Admire the progress!!!!

6. Paint the cabinet box before attaching the doors.

7. Attach the doors and hold your breath and pray they shut properly…

8. Thank the Lord they shut properly!

9. Now have fun loading it up!!!


10. Admire the creation that cost you a total of $19.50 and go spend the extra $5.50 on more supplies!


RSS
RSS
RSS

I'm linking up here:

Home Stories A2Z TDC Before and After   Organize and Decorate Everything

Easy Peasy, Lemon Squeezey

Hey you! How ya doin'? Me? I'm taking it easy, but doing OK. Thank you so much for understanding my need to postpone Un-Clutter It Thursday and for the sweet comments and emails that were sent. I shared them all with my family and you certainly brought us a ray of sunshine on a gloomy day. For now my niece is bed rest. We are hoping the contractions stop and my great-nephew will stay inside until April 24th or so.

To divert my attention I decided to work on quick project to link up to the Mission Possible: It's A Cinch with the ladies.


Mission? Floating Frame. 
Possible? Oh yeah!

Materials: 
 - Antique Frame... Check
 - Smaller Frame... Check
 - Fishing Line... Check
 - Staple gun... and Check!

Price? Just 10 minutes of my time.

Lets do this!

Initially I put a staple on the back top and bottom of the antique frame and tied the fishing line to it.

Then tied the line to the smaller frame.

But then I made the project even simpler and just stapled the line to the frame. Duh, Iesha! And that's all! (Don't worry I removed the staple and nails that are sticking out.)

Pure simplicity!


And when I finally got the light right the wire is almost invisible... hence, the floating frame.

Easy peasy, lemon squeezey!

Till next time...


RSS
RSS
RSS

Partying here this week:
The Girl Creative DIY Show Off Project Parade